
Hc-SR04
Ultrasonic Distance Sensor


In this
instructable I will show you how to make an ultrasonic sensor (hc-sr04) that
measures distances up to 200 cm.
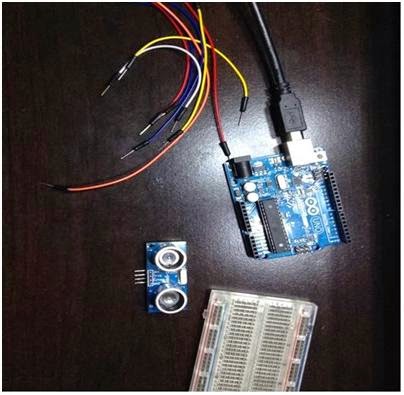
Step 1: Parts And Tools
These are the parts and tools needed to make this
project:

Attach the ultrasonic sensor to the breadboard and attach 4 wires from
the rails corresponding to the pins on the ultrasonic sensor.
Step 3: Connect The Arduino To Appropriate Pins
Connect the trig. Pin to pin 12 on the
arduino and the echo pin to pin 11 and connect the negative and positive pins
to the negative and positive rails on the breadboard.
Step 4:
Connect Negative And Positive Pins

Connect the negative rail on the breadboard to the
negative pin on the arduino and the positive rail on the breadboard to the 5
volt pin on the arduino.
Step 5: Upload Test Code

Copy it to libraries folder.
Upload this code to the arduino from
new ping: //
---------------------------------------------------------------------------
// Example NewPing library sketch that does a ping about 20 times per second.
// ---------------------------------------------------------------------------
#include <NewPing.h>
#define TRIGGER_PIN 12 // Arduino pin tied to trigger pin on the ultrasonic sensor.
#define ECHO_PIN 11 // Arduino pin tied to echo pin on the ultrasonic sensor.
#define MAX_DISTANCE 200 // Maximum distance we want to ping for (in centimeters). Maximum sensor distance is rated at 400-500cm.
NewPing sonar(TRIGGER_PIN, ECHO_PIN, MAX_DISTANCE); // NewPing setup of pins and maximum distance.
void setup() {
Serial.begin(115200); // Open serial monitor at 115200
baud to see ping results.
}
void loop() {
delay(50); // Wait 50ms between pings (about 20
pings/sec). 29ms should be the shortest delay between pings.
unsigned int uS = sonar.ping(); // Send ping, get ping
time in microseconds (uS).
Serial.print("Ping: ");
Serial.print(uS / US_ROUNDTRIP_CM); // Convert ping
time to distance in cm and print result (0 = outside set distance range)
Serial.println("cm");
}
Step 6: Test By Using Serial Monitor

Open the serial monitor in the arduino IDE and Set the
baud rate to 115200 and move your hand in front of the sensor and look at the
serial monitor you should see the distance change on the serial monitor.
Step 7: Going Further... Adding An Led

If you want to use an led to indicate the distance you
can connect an led to pin 13 and negative and upload this code:
// ---------------------------------------------------------------------------
// Example NewPing library sketch that does a ping about 20 times per second.
// ---------------------------------------------------------------------------
#define ledPin 13
#include
#define TRIGGER_PIN 12 // Arduino pin tied to trigger pin on the ultrasonic sensor.
#define ECHO_PIN 11 // Arduino pin tied to echo pin on the ultrasonic sensor.
#define MAX_DISTANCE 200 // Maximum distance we want to ping for (in centimeters). Maximum sensor distance is rated at 400-500cm.
NewPing sonar(TRIGGER_PIN, ECHO_PIN, MAX_DISTANCE); // NewPing setup of pins and maximum distance.
void setup() {
pinMode (ledPin, OUTPUT);
Serial.begin(115200); // Open serial monitor at 115200
baud to see ping results.
}
void loop() {
delay(50); // Wait 50ms between pings (about 20
pings/sec). 29ms should be the shortest delay between pings.
unsigned int uS = sonar.ping(); // Send ping, get ping
time in microseconds (uS).
Serial.print("Ping: ");
Serial.print(uS / US_ROUNDTRIP_CM); // Convert ping
time to distance in cm and print result (0 = outside set distance range)
Serial.println("cm");
if (uS / US_ROUNDTRIP_CM > 20) { // This is where
the LED On/Off happens
digitalWrite(ledPin,HIGH); // When the Red condition
is met, the Green LED should turn off
}
else {
digitalWrite(ledPin,LOW);
}
if (uS / US_ROUNDTRIP_CM <= 20 || uS /
US_ROUNDTRIP_CM >= 0){
}
else {
Serial.print(uS / US_ROUNDTRIP_CM);
Serial.println(" cm");
}
delay(500);
}
You can also read the article here : http://www.instructables.com/id/Hc-sr04-Ultrasonic-Distance-Sensor/